There are few things I adore more than styling up a pretty table for a gathering — so I jumped at the chance to borrow vintage jadeite and milk glass pieces from the new Pop and Circumstance rentals collection and pull together a festive New Year’s Brunch. Jadeite was probably one of the first vintage items that I started to collect when tagging along with my mom and aunt to estate sales and flea markets. I’m drawn to the rich cool colors and all of the variety in how the material was used for kitchenwares. This collection has grown to include quite the comparable set of milk glass as well, and Becky — the owner of Pop and Circumstance— and I have bonded over our mutual love for the pieces. I used a few pieces from my collection as inspiration and Becky filled in the rest with vintage linen napkins, milk glass tumblers that were used to hold flatware, and even a nesting set of jadeite bowls for me to mix up my mini-pancakes in. These tiny pancakes were the focal point of the brunch — mini-stacks topped with berries make for an easy grab off the buffet table when guests are mingling (and isn’t everything cuter when we make it bite-sized?).
Do you have one of those recipes in your back pocket that works for just about any occasion? Mine is so simple it’s almost embarrassing: Rice Krispy Treats! It’s the one thing that I always get asked to make for friends’ parties. For a recent holiday party I decided to add a fresh twist to my classic recipe and make a Neapolitan version with classic flavor layers of chocolate, strawberry and vanilla ice cream. It takes just a simple modification of the traditional Rice Krispy Treat recipe, full instructions below:
Following the traditional instructions to make Rice Krispy Treats, prepare the ingredients and press a layer of the classic flavor into a lightly greased baking pan. Work quickly to add the next layer so they don’t cool too much — the strawberry layer is exactly the same recipe as the classic Rice Kripy Treat, but when you’re melting the butter and marshmallows together you want to add in 4 drops of pink food coloring and 1 tsp of strawberry extract (you can usually find these near the vanilla extract in the baking aisle!). Press the strawberry mixture directly on top of the classic layer. Next, make the chocolate layer with the same classic recipe, but mix in Cocoa Krispies in lieu of Rice Krispies. Then, pour the Cocoa mixture on top of the Strawberry layer and cover with a large piece of parchment paper. Use a rolling-pin to roll over the parchment paper and press the layers down. Set them aside and let cool completely to solidify. When you’re ready to serve them, flip the baking dish upside down with the parchment paper on the table, slowly lift the dish up and reveal the compressed layers. All that’s left to do is to cut them up into squares with a serrated knife, and try not to eat them all in one sitting!
This weekend I was in major need of some comfort after a long string of holiday parties and maybe a few too many glasses of champagne (shh!). My usual go-to comfort food is a bowl of pasta, but I decided to mix it up this time and try a savory chicken dish with a creamy sun-dried tomato sauce, lots of sautéed mushrooms and shallots, and a little crispy bacon and goat cheese just to amp up the richness. Full recipe below if you’re in need of comfort food too!


Ingredients:
- 3-4 large chicken breasts
- 2 large Portobello mushroom caps
- 2 small shallots
- 2-3 slices of thick cut bacon
- 6 sun-dried tomatoes in oil (reserve oil)
- 3 garlic cloves
- 3/4 cup of light cream
- 1 tbsp of goat cheese
- 1/4 cup of freshly grated parmesan, plus extra for garnishing
- 2 sprigs of fresh tarragon
- Olive oil
- Salt and pepper
Instructions:
- Heat a large cast iron skillet on high and drizzle with olive oil.
- Season chicken breasts with salt and pepper and brown in the hot pan on both sides.
- While the chicken is browning, roughly chop mushrooms, shallots, bacon and sun-dried tomatoes; mince garlic.
- Remove chicken from pan when cooked through, add 1/2 tbsp of the sun-dried tomato oils and 1 tbsp of butter to the pan, then toss mushrooms, shallots, bacon, garlic and sun-dried tomatoes and sauté mixture. (Scrape the pan to loosen any browned bits from the pan).
- Lower heat to medium and stir in 3/4 cup of light cream, 1 tbsp of goat cheese, and 1/4 cup of freshly grated parmesan cheese; stir continously to break down the cheese and incorporate the tomatoes flavors with the cream.
- Add the chicken back to the pan while the sauce cooks and thickens.
- Remove from heat, garnish with fresh parmesan cheese and torn tarragon leaves.
- Try serving over pasta or a bed of spinach.
From the time that I first heard about Farm and Fable’s Cookbook Book Club, I was sold — what is better than hanging out with a group of friends and chatting about cookbooks? Oh right, eating the recipes from them! I finally was able to join one of the meet-ups this weekend and it was a ton of fun. This month the book was Huckleberry, the new cookbook from the famed Santa Monica bakery. While I love cooking, I’m actually not the most skilled baker (sticking to proportions and instructions can be tough for me, I always want to add more butter, oops!), so I ended up picking one of the more savory recipes from the book, a tomato goat cheese cobbler. It was really tasty, and so were the 10 other recipes that book club attendees made. My favorite? The chocolate banana bread bundt cake — holy yum. I loved getting to hear their experiences with the recipes and even got a few new tips and tricks to use next time!
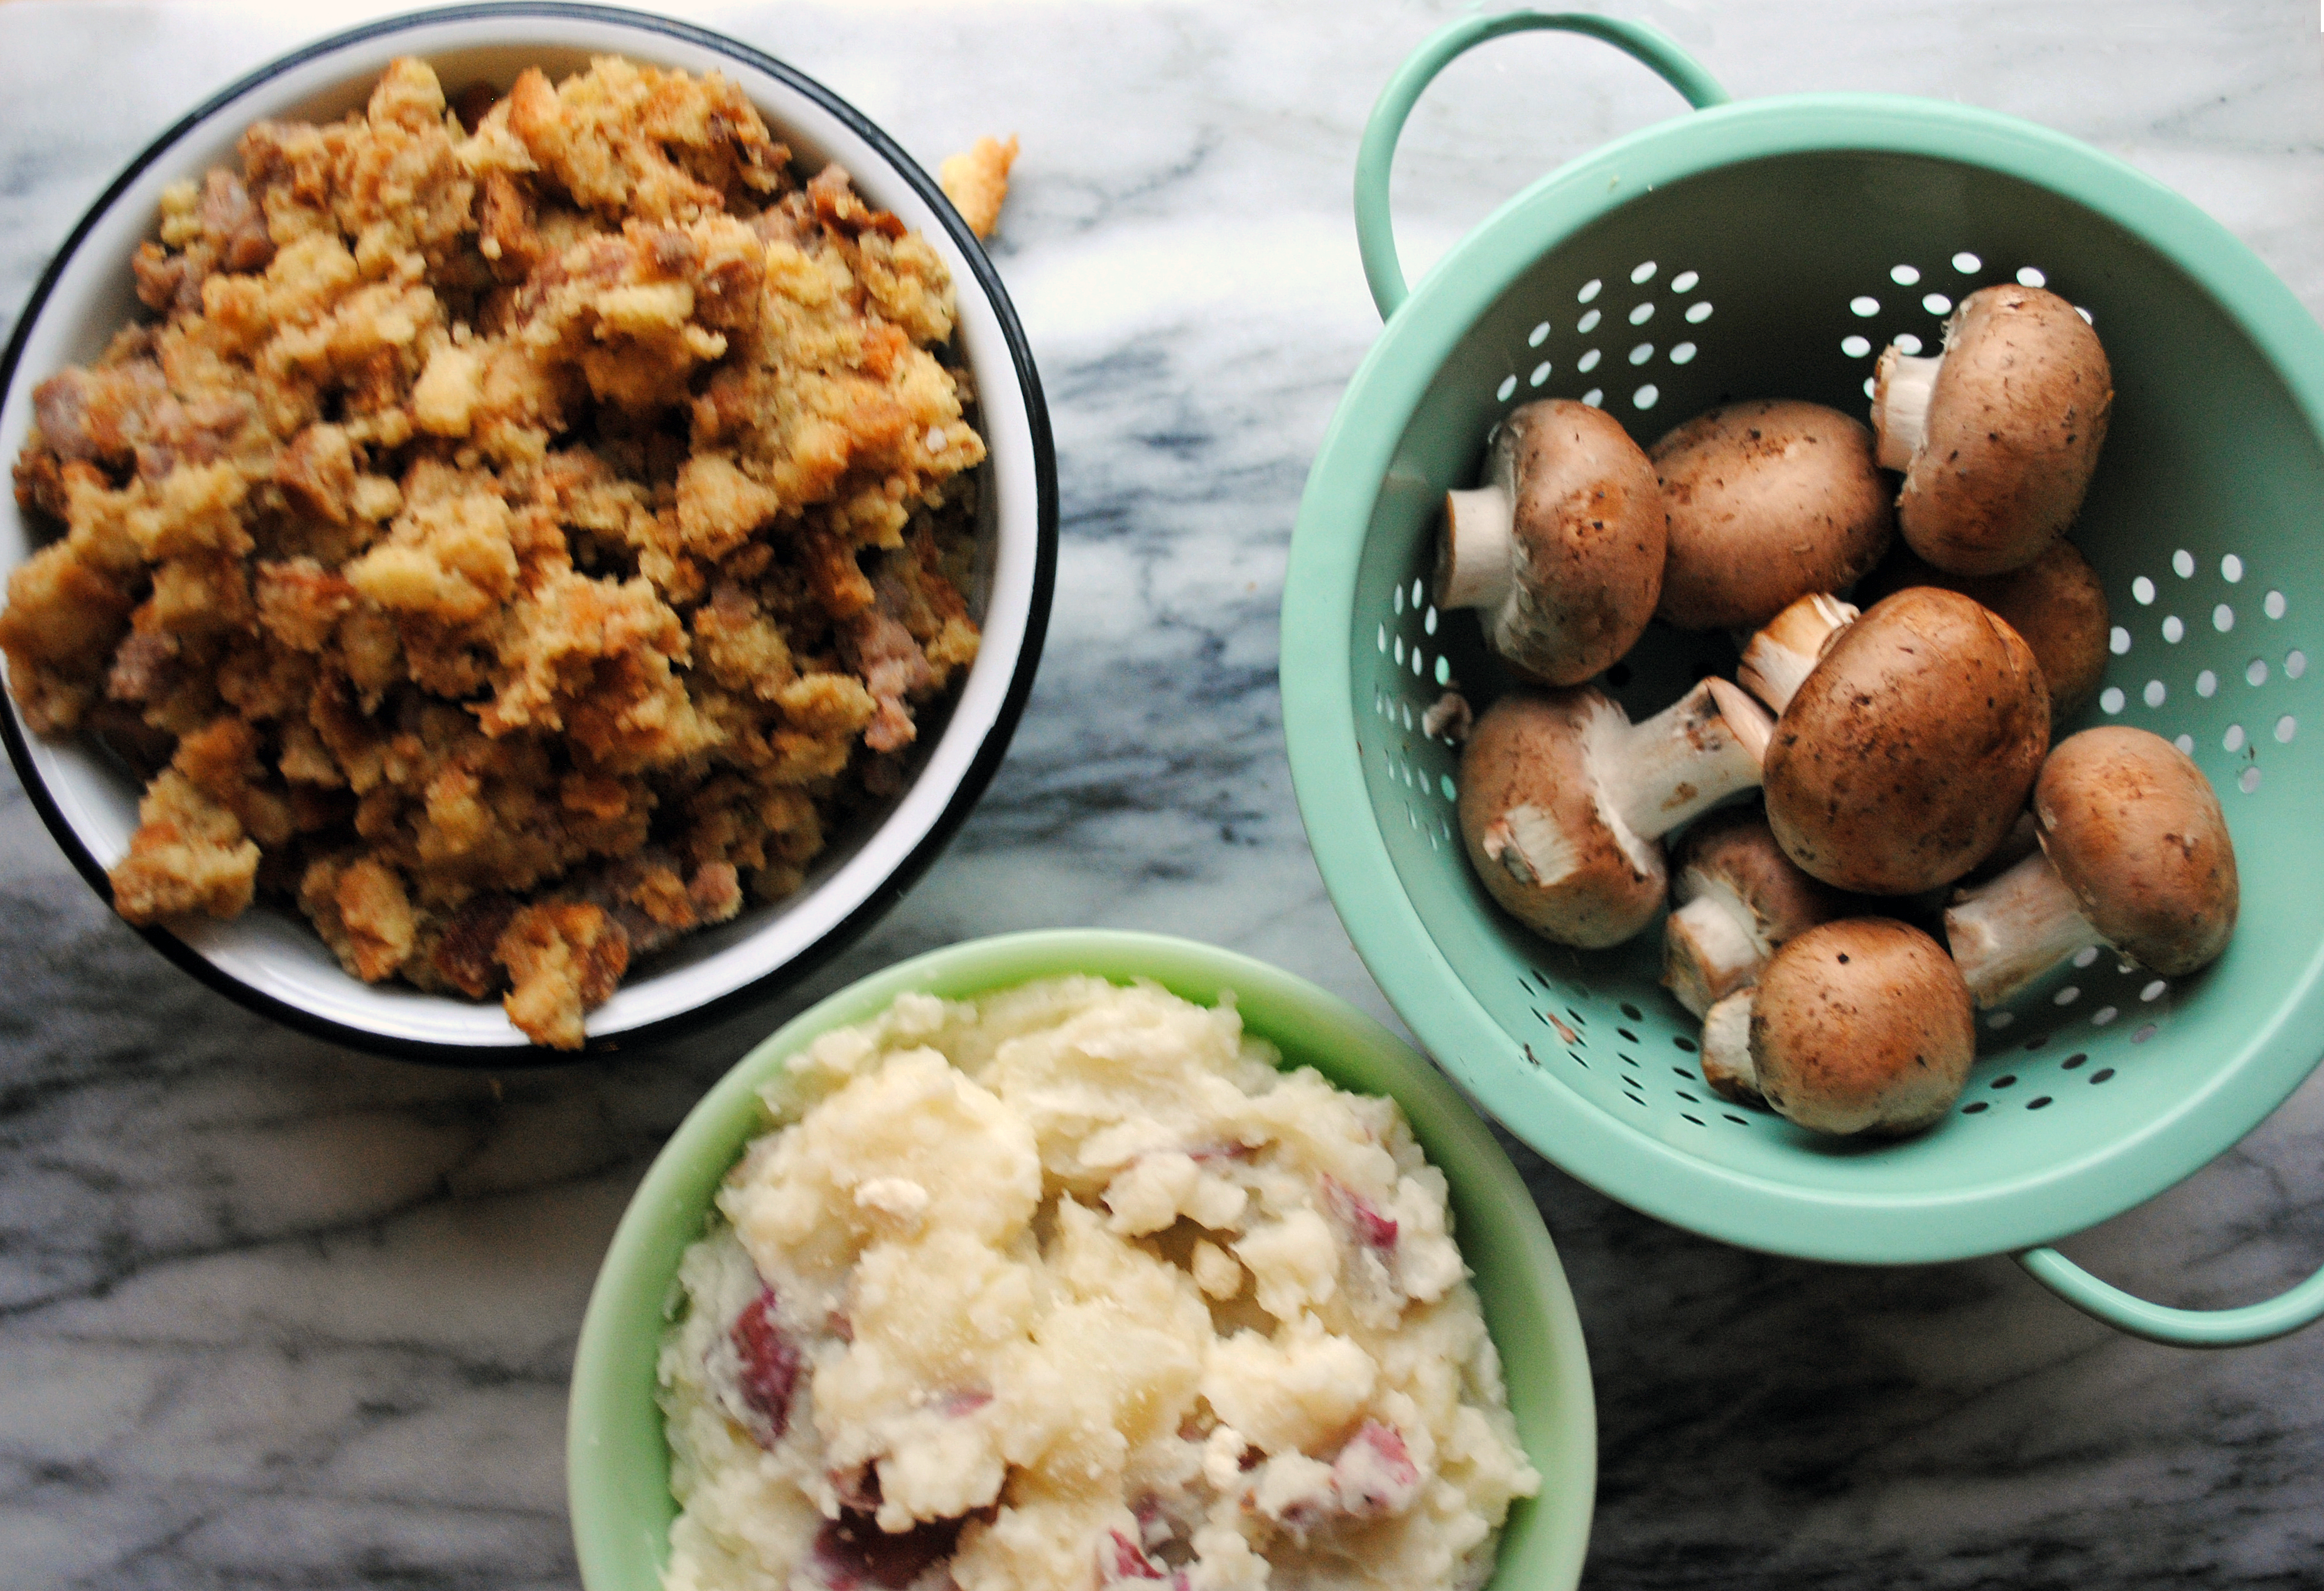
- Mushroom caps
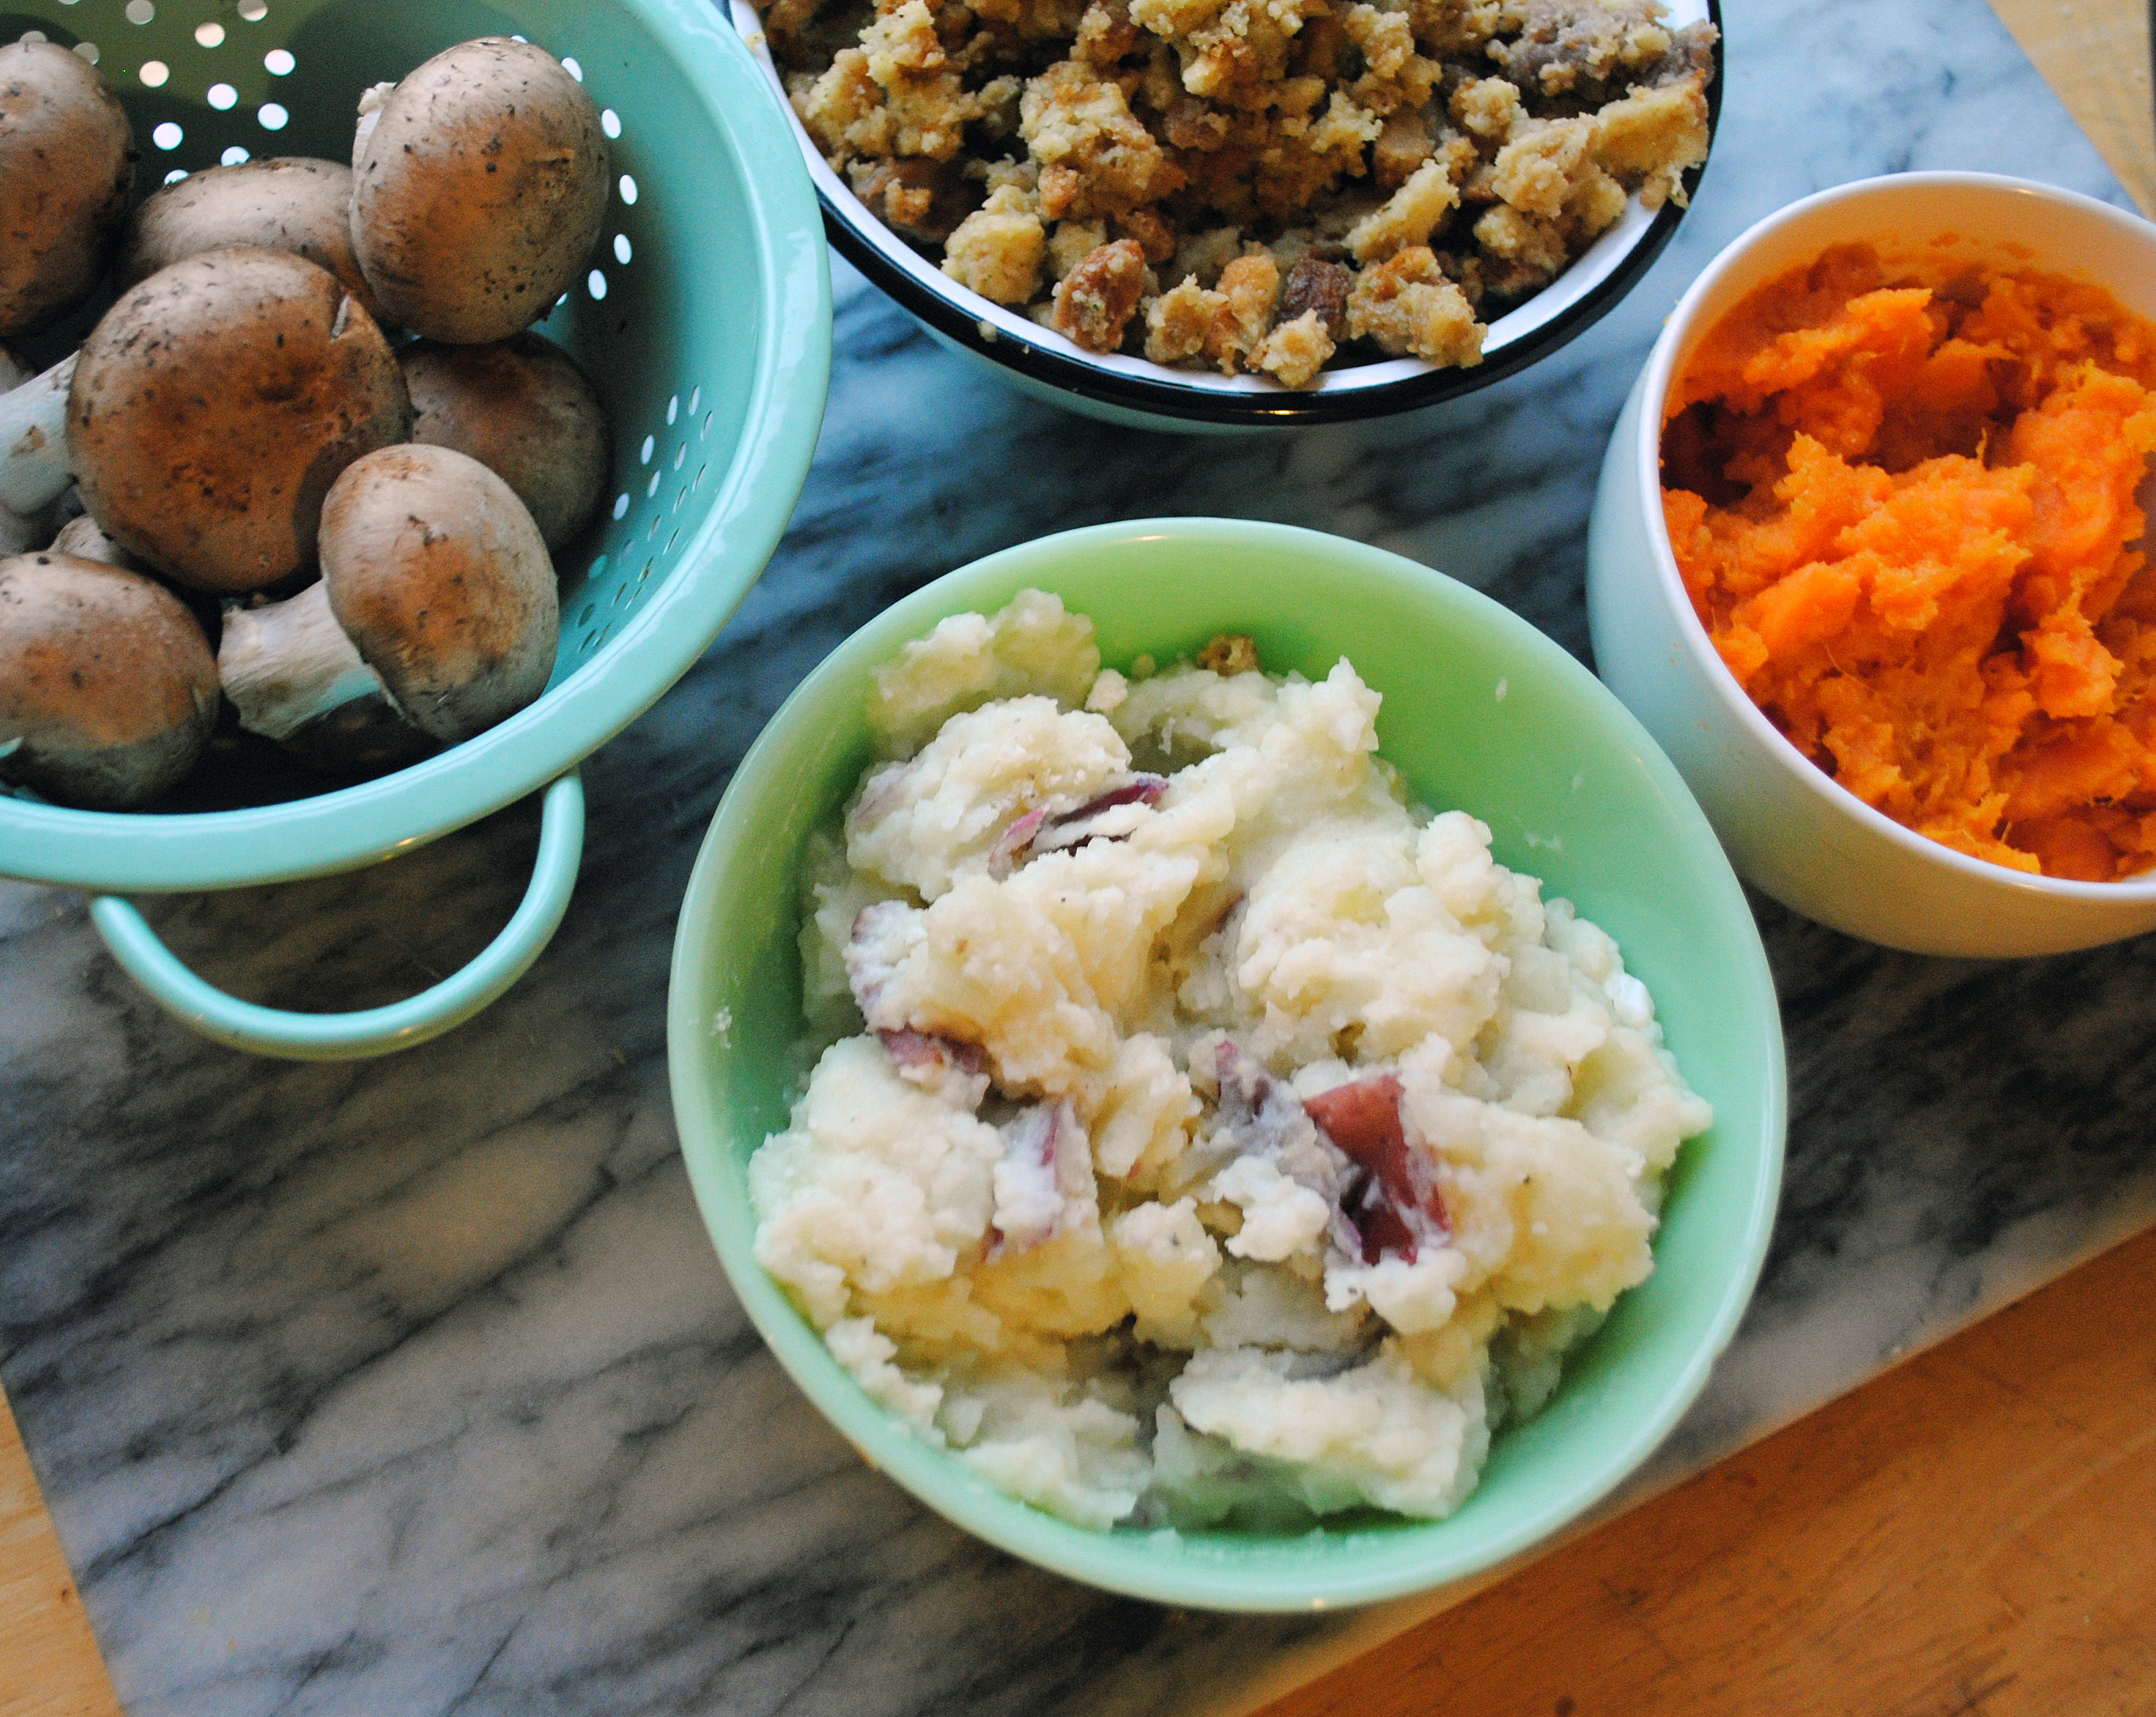
- Leftover mashed potatoes
- Parmesan cheese
- Leftover baked sweet potatoes (1 potato)
- 1 tsp Butter
- 1 tsp Honey
- Leftover stuffing
- Cooked italian sausage
- Salt and pepper
- Parsley (for garnish)
- Green Onions (for garnish)
- Crispy bacon (for garnish)
- Preheat oven to 350 degrees
- Clean the mushroom caps and remove stems.
- Using a small spoon or melon-baller, scoop out the inside of the mushroom caps to make room for filling (cup the mushrooms in your hand to keep them from breaking.
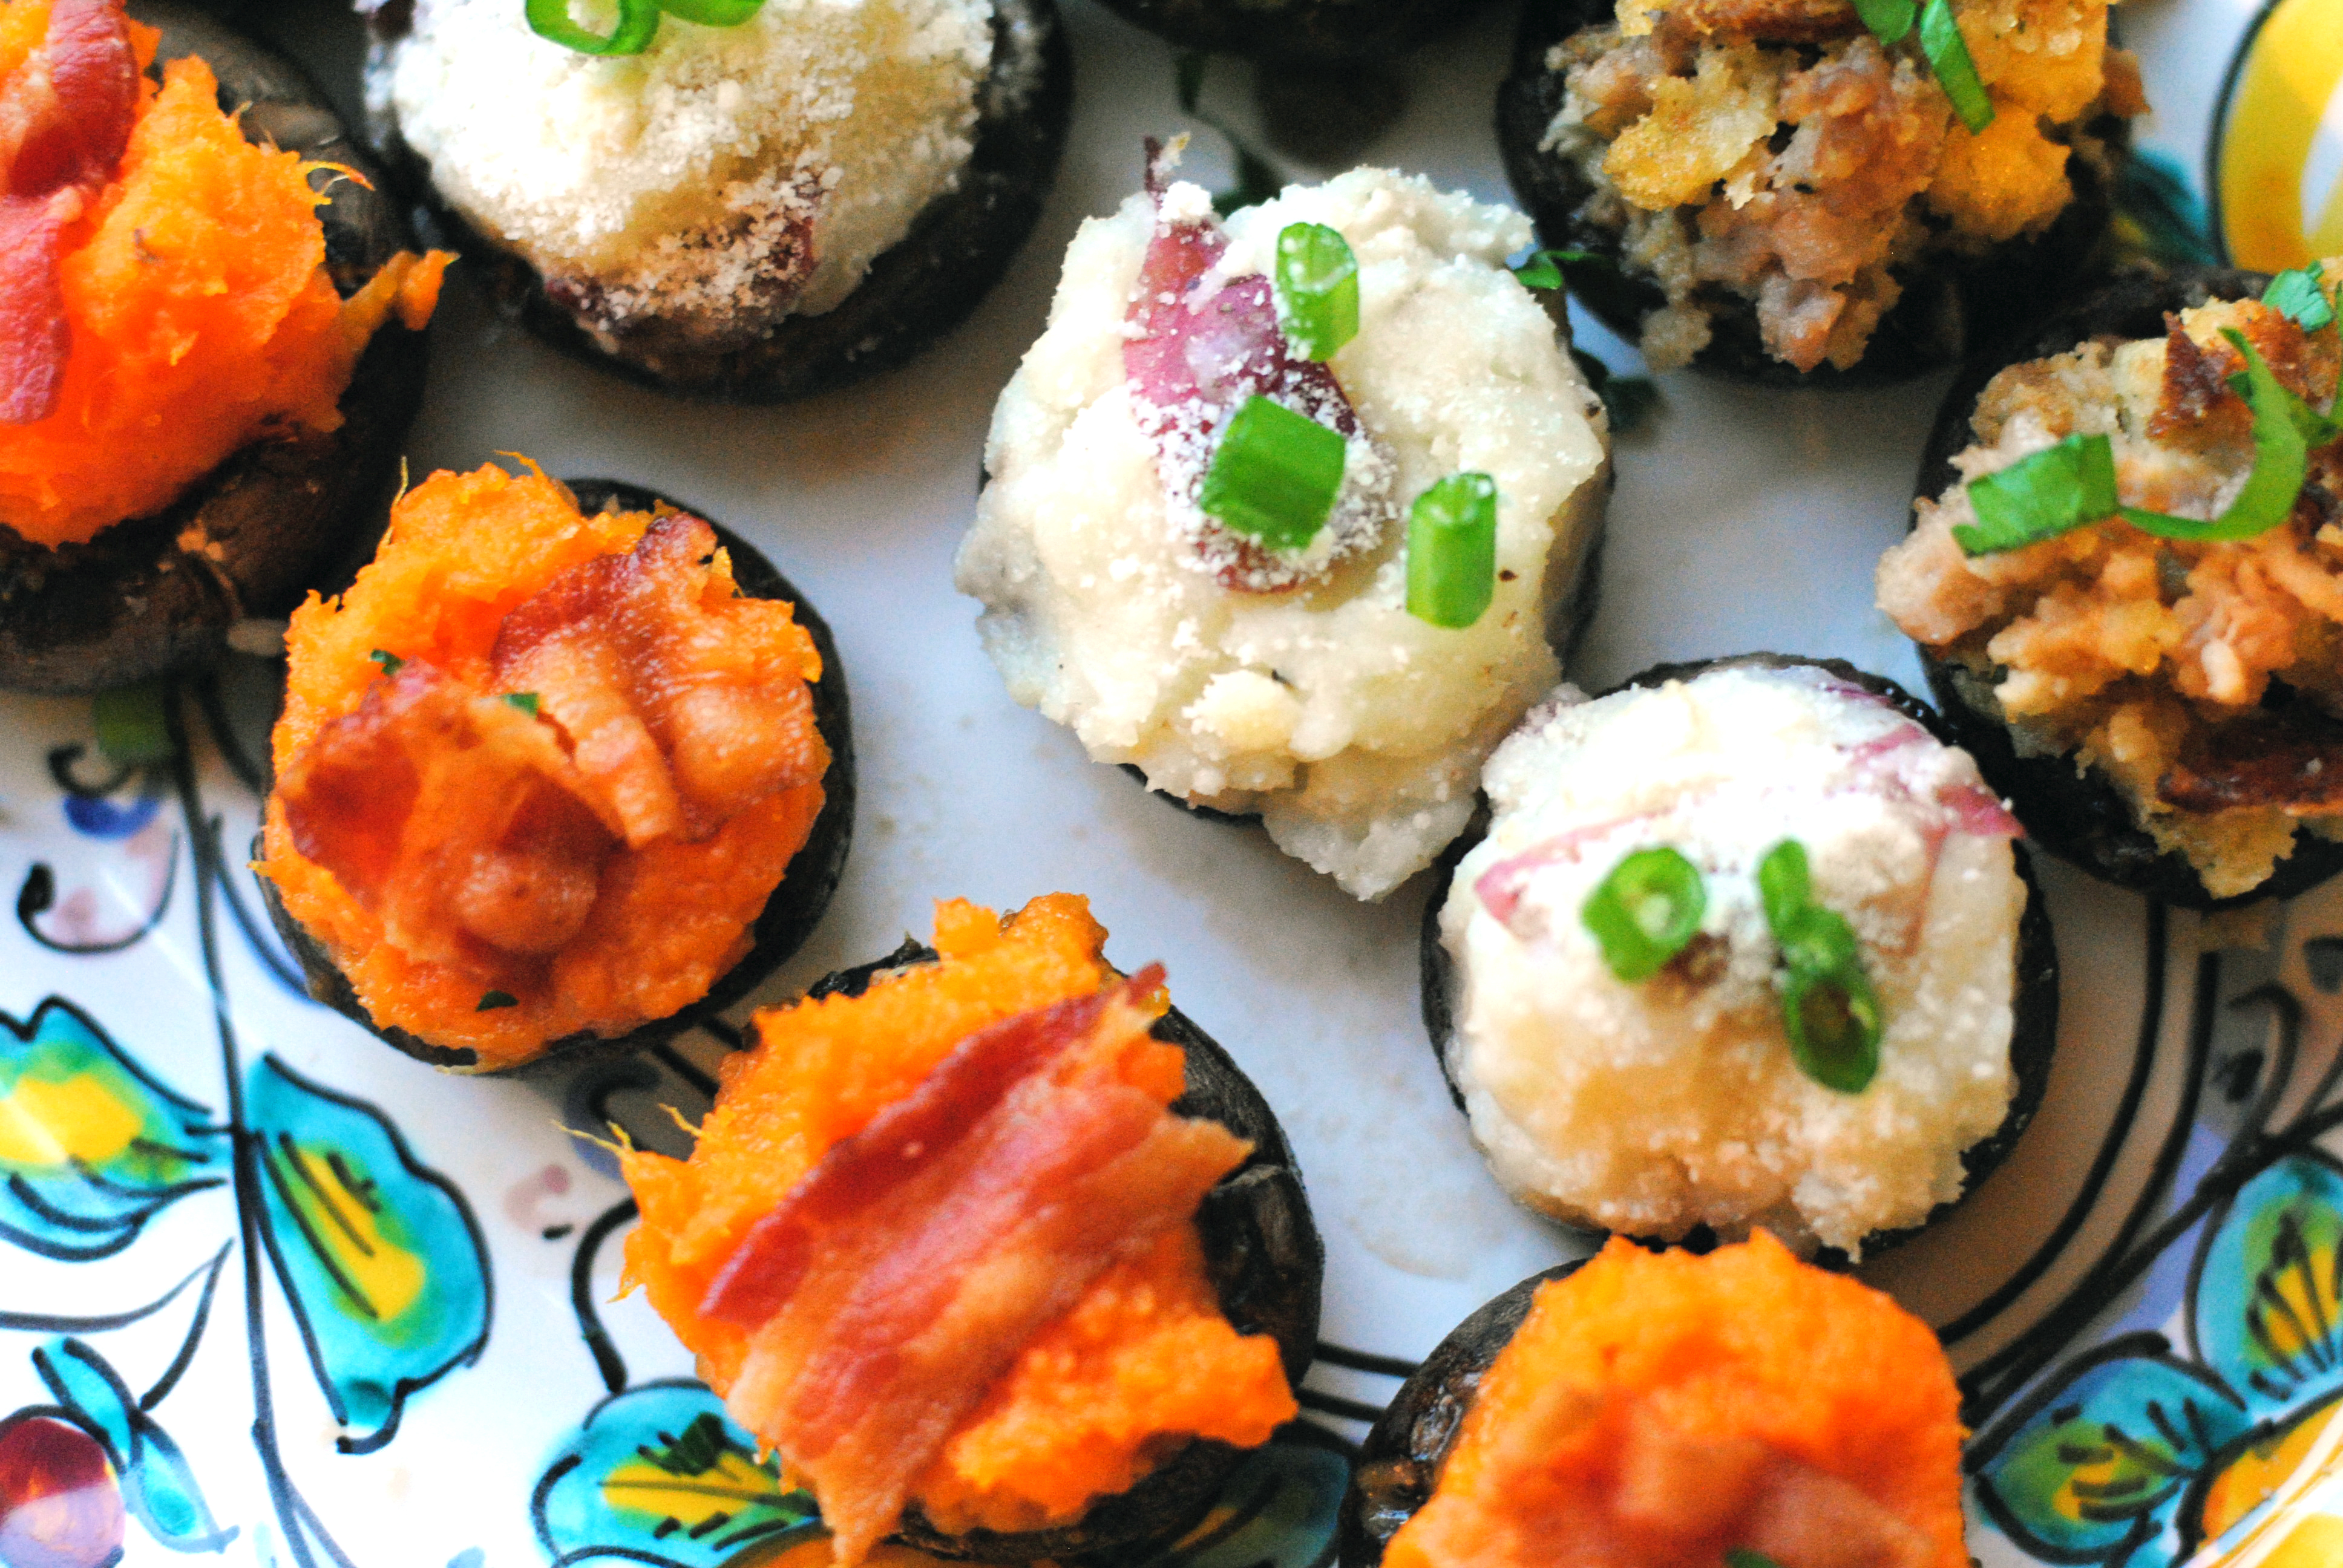
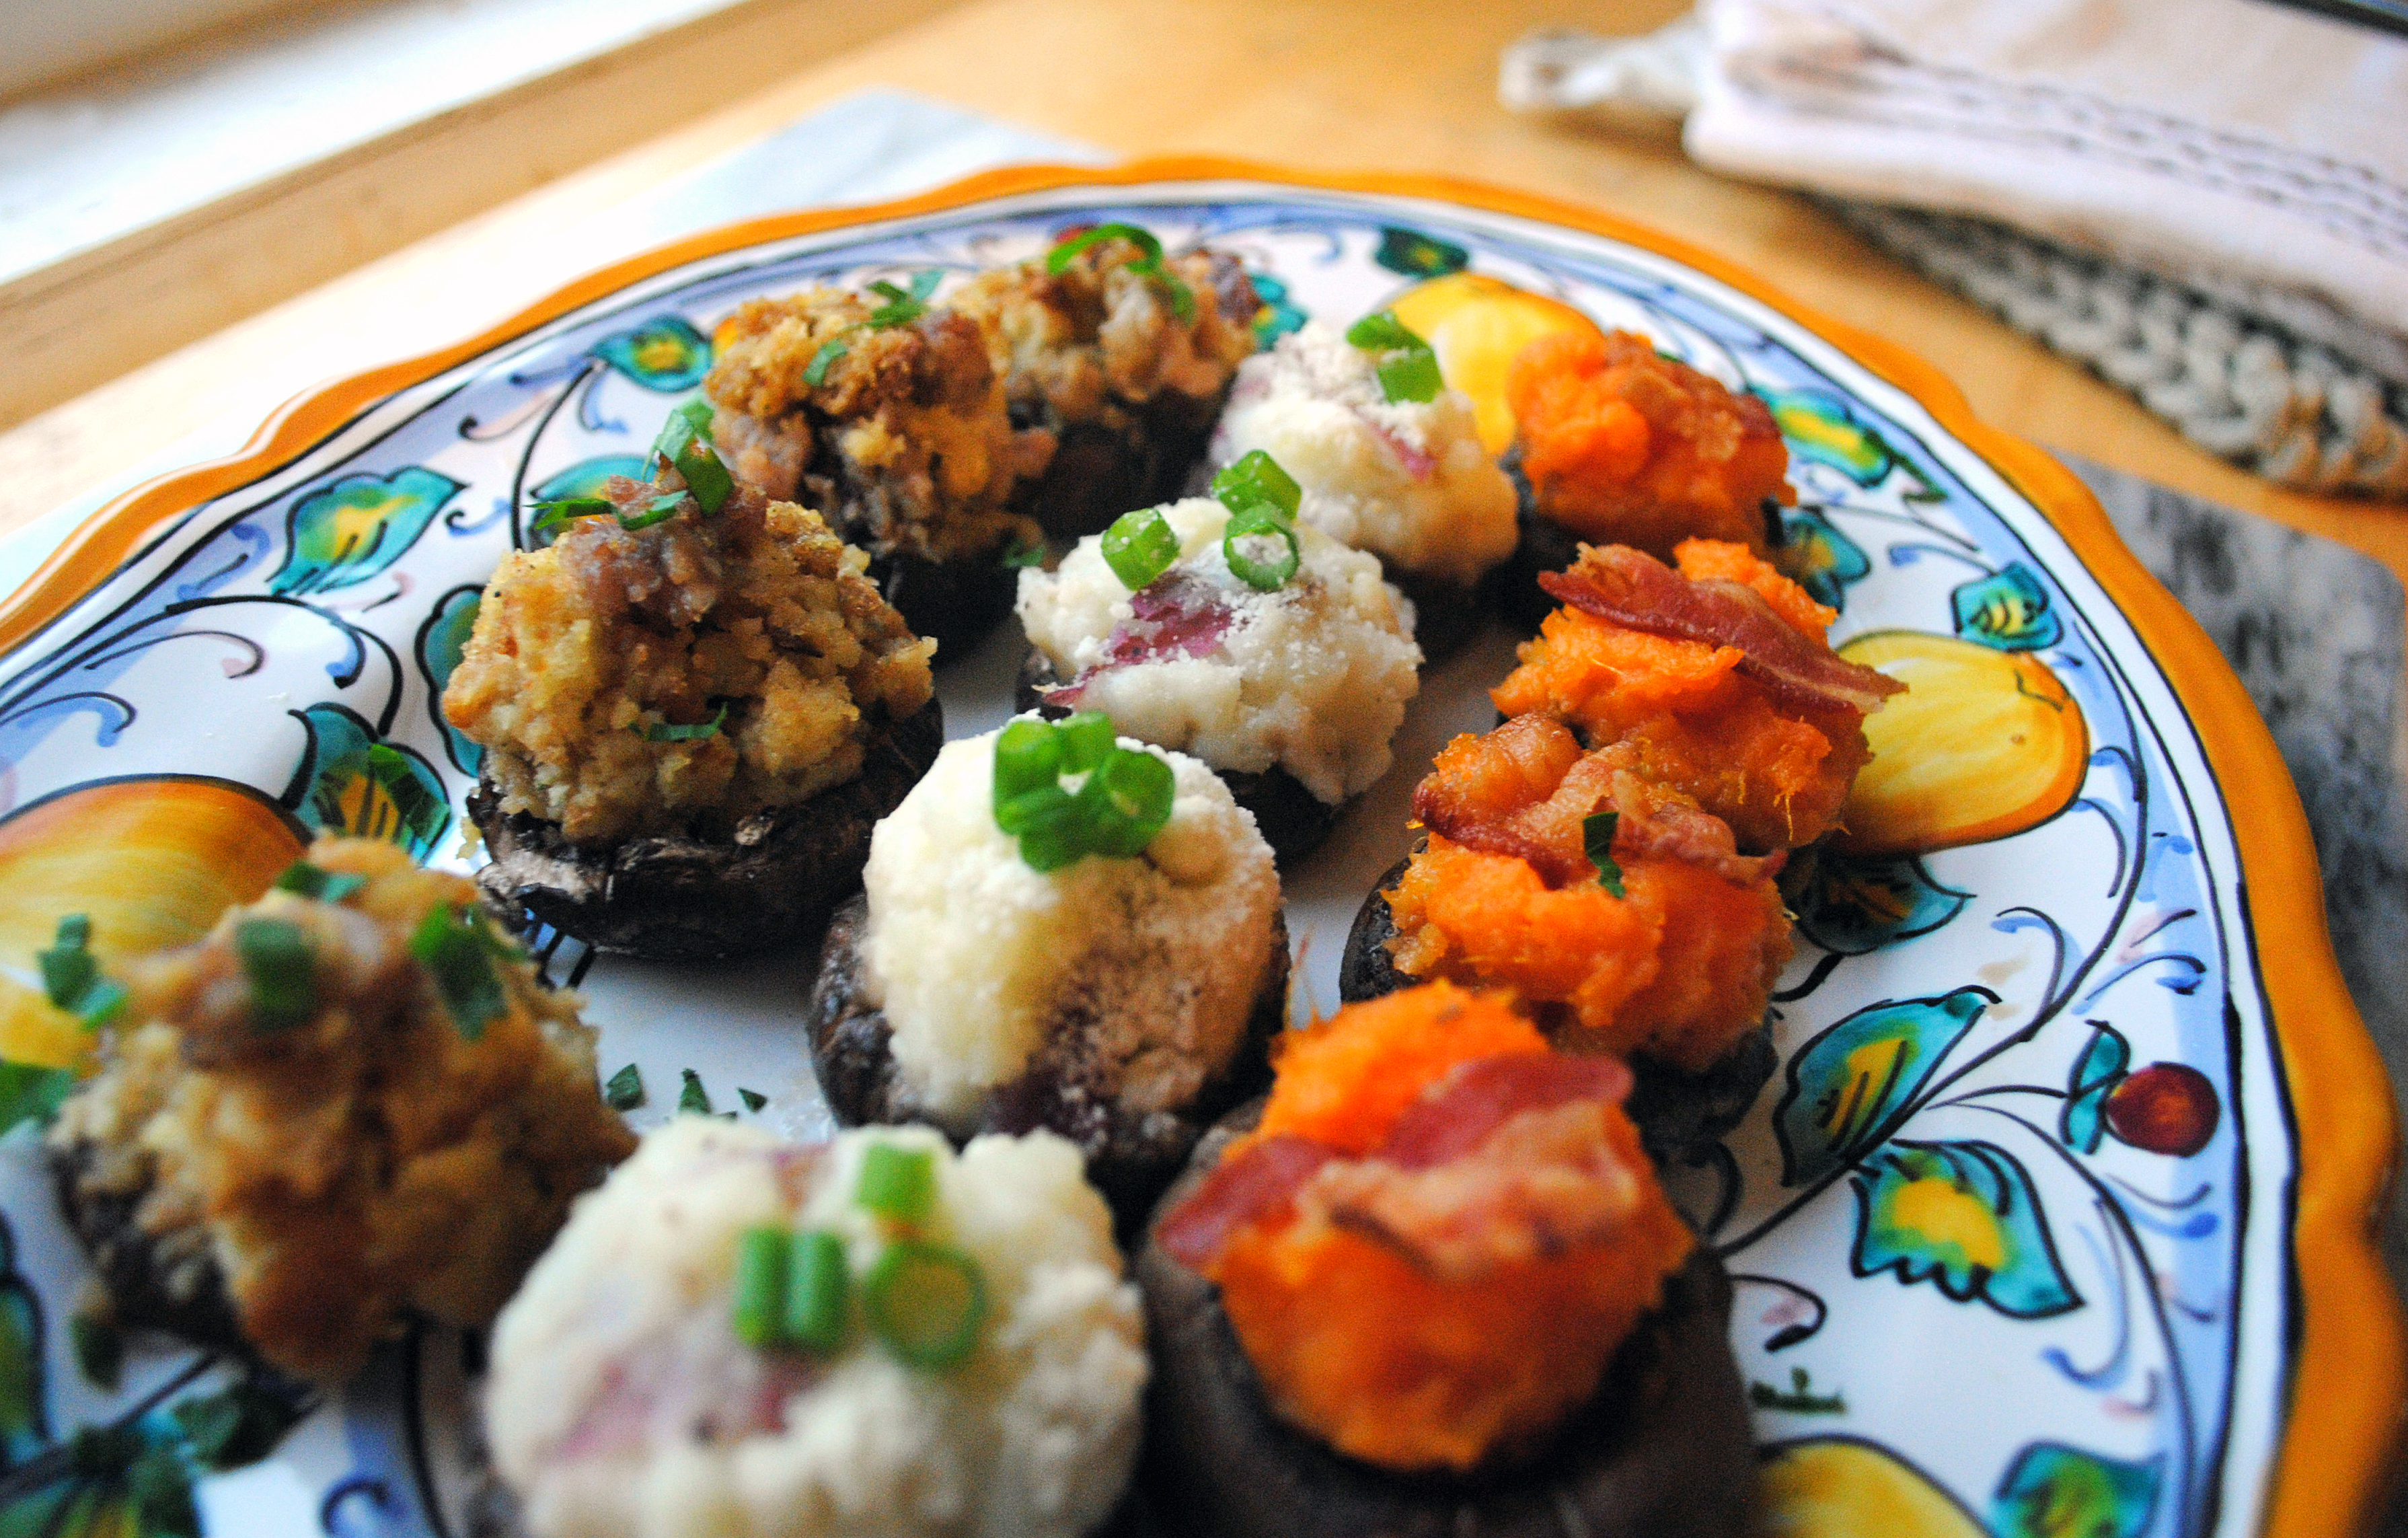
- For Mashed Potatoes: fill mushroom caps with leftover potatoes, sprinkle with parmesan cheese.
- For Sweet Potatoes: combine sweet potatoes with a drizzle of honey and melted butter; fill caps with mixture.
- For Stuffing: combine leftover stuffing with cooked and chopped italian sausage, fill caps with mixture.
- Arrange filled mushroom caps in a baking dish, salt and pepper to taste, and bake for 20 minutes in a 350 degree oven.
- Remove and garnish: add green onions to the top of the mashed potato stuffed mushrooms; chopped crispy bacon to sweet potato stuffed mushrooms, and minced parsley to the top of stuffing filled stuffed mushrooms.
At the Wayfair + Boston Bloggers ‘Home for the Holidays’ Event last weekend, my Boston-blogging partner in crime Alison gave a great chat about planning your content around the holidays and one of her pieces of advice was resurfacing old posts to share when seasonally relevant. It got me thinking about some of my favorite Thanksgiving recipes from blog posts past. As I’m sure you’re in a similar Thanksgiving menu planning mode that I’m in this week, I thought I’d round up four of my favorite that offer a fun twist on a traditional Thanksgiving food element.
To start things off: a seasonal cocktail that brings apple cider to the forefront, Apple Autumn Punch. A tasty appetizer that brings in the sweet flavors of apple pie but the savory balance of a baked brie, Baked Brie with Apple Compote. We always have mac and cheese on our Thanksgiving menu for the vegetarians, and this version is baked in cored apples; Mac and Cheese Baked Apples. For dessert, I’ve tried a bite sized version of pumpkin pies and used cookie cutters to spell out a message of thanks: Thankful for Pie.
The other day at work the topic of Thanksgiving foods came up, and while it’s not a traditional Thanksgiving food, I mentioned that we always have a mac and cheese at ours because my siblings aren’t big on turkey. One of the best mac and cheese dishes that I’ve ever eaten was on our honeymoon, and the dish came served with a side of homemade applesauce — delicious. My wheels started turning for how I could combine these flavors in a new way, and I came up with this cute little idea for a savory and sweet side dish: mac and cheese baked apples. I love the idea of offering these in small apples as an appetizer, or as a bigger portion for a side dish at dinner — either way, they’re a super tasty treat. Full recipe below!
- 4-5 large apples (honey crisp apples worked great)
- 5 cups of cooked pasta (elbows work great!)
- 3 tbsp butter
- 3 tbsp all purpose flour
- 1 cup whole milk
- 2 tbsp parmesan cheese
- 1 cup of shredded sharp cheddar cheese (plus extra for garnish)
- salt and pepper
Instructions:
Cook pasta as directed, removing from water when still al dente. Clean apples and slice their tops off; using a melon-baller, scoop out the insides of the apple leaving a half-inch rim around the edges. In a saucepan over medium heat, melt butter and begin to whisk in flour until a roux forms, then slowly whisk in the cup of milk and heat until the sauce thickens. Next, mix in the cheeses and combine until the sauce is a consistent texture. Remove from heat fold in pasta until fully coated; salt and pepper to taste. Fill the hollowed-out apples with macaroni and cheese mixture, and top with additional sharp cheddar cheese. Bake in a baking dish in a 400 degree pre-heated oven for 20-25 minutes.
I’ve been trying to be better lately about not wasting food. Cooking for two means we unfortunately sometimes end up tossing out lots of leftovers, so I’ve been challenging myself to be creative with what’s in the fridge and use as much as I can. We had a roasted chicken for dinner this weekend so I was brainstorming ideas for what to make with the extra meat. I whipped up a batch of chicken stock with the bones from the chicken and decided it would make a pot-pie, but in order to use more of the stock and chicken, I made it into a soup instead. I even added a fluffy biscuit for dipping to get the crust flavors. Full recipe below:
Ingredients:
- 3-4 small red potatoes
- 1 large carrot
- 1 yellow onion
- Olive oil
- Salt and pepper
- 3 tbsp flour
- 3 cups of chicken stock
- 1 cup of half and half
- 1.5 cups roasted chicken, shredded
- 1 cup of fresh corn
- 1/2 cup of frozen peas
Instructions:
Dice red potatoes, carrot, and onions. Toss with olive oil, salt and pepper and roast at 450 degrees for 20 minutes. Add roasted mixture to a large pot with 1 tbsp of olive oil. As the mixture heats up, stir in flour until it dissolves and coats the vegetables. Add chicken stock and half and half and bring the soup to a low boil. Reduce to medium heat and add in chicken, corn, and peas. Simmer for 15 minutes to blend flavors; add salt and pepper to taste. Serve with a warm biscuit for dipping.
I’m super lucky to work so close to Flour Bakery — when I go there for lunch, which is often, I tend stick to the same order each time. This week though, a quiche on their weekly specials board caught my eye: sweet potato and blue cheese. These are two of my favorite flavors, but I never thought to put them together until I saw them on the menu. I ordered the quiche — it was amazing — and left with determination to use this flavor combination in a dish of my own soon. My spin on the Flour Bakery quiche is a sweet potato blue cheese frittata — full recipe below:
Ingredients:
- 1 Large sweet potato
- 1 Small yellow onion
- Olive oil
- Salt and pepper
- 6 eggs
- 1/2 cup of milk
- 1/3 cup of crumbled blue cheese
- 1 tsp fresh thyme
Instructions:
Preheat oven to 450 degrees. Peel sweet potato and dice into small cubes, thinly slice yellow onion and toss with sweet potatoes in a pie dish with a drizzle of olive oil, salt, and pepper. Roast in the oven for 20 minutes, tossing mixture at the halfway point. Remove from oven and let cool slightly before crumbling 1/3 cup of blue cheese over the roasted mixture. In bowl, whisk 6 eggs with 1/2 cup of milk and 1 tsp of fresh thyme leaves, salt and pepper. Pour egg mixture over sweet potatoes in pie dish. Bake at 350 degrees for 40 minutes.
I am absolutely terrible at packing my lunch for work — I try to bring leftovers every once in a while, but I tend to prefer heading out for lunch to get something fresh. When a copy of Mason Jar Salads and More showed up in my mailbox though, I figured it was good motivation to make something tasty to bring along with me to work this week. The book has lots of good tips for layering salads and meal ingredients in mason jars to keep them fresh and crisp (dressing on the bottom, and pack down ingredients over it to keep other ingredients from getting soggy!). I took inspiration from the book’s caprese pasta recipe and made my own version: spinach tortellini with pesto, mozzarella, grape tomatoes, red onions, grilled corn, and more tortellini on top — the flavors melded together great!


